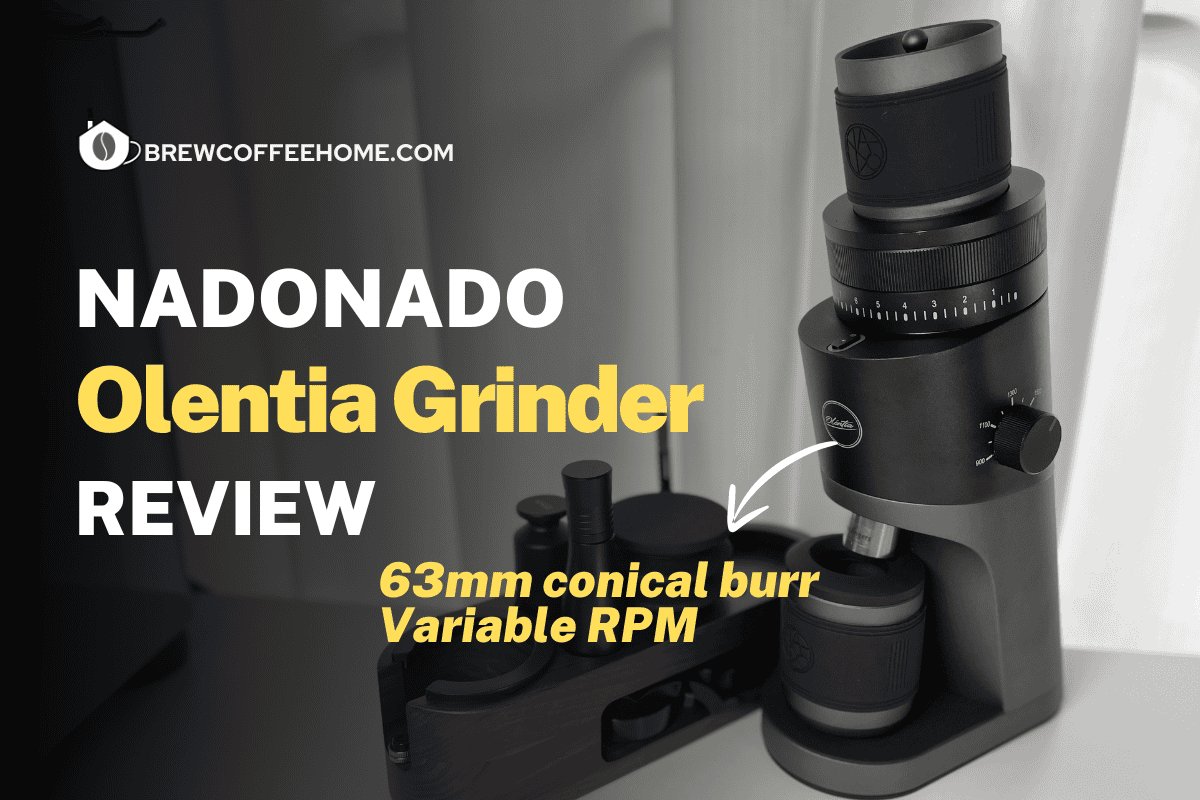
Recently I’ve tested the Olentia coffee grinder from Korean company NadoNado.
This grinder brings impressive features, including a 63mm conical burr, adjustable RPM settings, and a modern, high-quality design. It also comes with a range of well-crafted accessories that make it easy to use.
If you’re looking for a single-dose grinder with a large conical burr, the Olentia is a great new option to consider. Let’s take a closer look at what it has to offer.
Here is my hands-on review on YouTube, check it out.
Just a note—this unit is a prototype provided by NadoNado for testing, so the final model might have some changes. It’s now available on IndieGogo; you can get an early bird discount. Check it out.
Unboxing the Olentia
The unboxing experience is impressive, with everything neatly packed in a stylish box. Right away, you can tell a lot of thought went into the design.

Inside, you’ll find high-quality accessories, including two beautifully crafted dosing cups—one for dosing and the other for catching grounds. Paired with knockers, they work as blind shakers.
Like many single-dose grinders, it comes with bellows to clear out the grinding chamber.
There’s also a 51mm magnetic dosing ring, a 58mm ring, a WDT tool for distributing grounds, and an anti-popcorn rod.
The wooden station that keeps everything organized is a nice touch, fitting 51mm, 54mm, and 58mm portafilters.
Design and Build
The entire body of the Olentia grinder is made of metal, giving it a sleek, solid look and feel. The construction feels very sturdy, and there are no loose parts or rattles. The premium materials used throughout add to the overall impression of quality.
The control button is located on the front for easy access. Just press it to turn on the grinder, and a white LED lights up. Press it again to start grinding, and the LED turns red.
The grind adjustment is stepless, which allows for very precise control—a feature that’s essential for dialing in espresso. This adjustment system means you can make tiny changes to get the perfect grind for your beans.

There’s also a safety feature that stops the grinder if the adjustment ring is loosened too much, protecting the burr set.
The side of the grinder has an RPM adjustment dial, allowing settings from 900 to 1700 RPM. This is useful because RPM can influence the grind, especially for espresso. A higher RPM tends to create a different particle distribution compared to a lower one. I tested different settings and I’ll break down the differences between these settings in just a bit.

Another handy touch is the silicone mat at the bottom of the grinder. You can flip it up to store the power cord, which helps keep everything neat.

Burr Design
At the heart of the Olentia grinder is a Mazzer Kony style 63-millimeter conical burr. This burr set is both durable and efficient, featuring eight cutting edges that ensure uniform particle size. NadoNado ran multiple tests on different burr geometries before finalizing this design, and it shows—each burr blade is well-engineered to produce consistent results.

Noise Level
The motor in the Olentia is a 120-watt BLDC model, and I’m surprised at how quiet it is. It doesn’t have that loud screaming sound while grinding even when I set it to the highest RPM.
Retention
One of the standout features of the Olentia is its retention. I measured out 18.1 grams of beans, and the output was identical, with no loss at all.
This is a major plus for those who want consistent results without any waste. There’s also low static, which means no need for the RDT (Ross Droplet Technique) to prevent coffee dust.

Workflow for Espresso
The workflow with the Olentia is straightforward and satisfying. I set the RPM to 1300 and chose a grind size of about 5 for my espresso beans. Here’s how it works:
- Put the knocker in the dosing cup and measure 18 grams of coffee beans.
- Place the dosing cup on top of the grinder and drop the beans in.
- Put the anti-popcorn rod in and press the button to start grinding.
The grinding process is fast—it only takes about 10 seconds to grind the beans—and there’s very little static. When it’s done, press the bellows to push out any leftover grounds.
Transferring the grounds is simple. Fit the dosing cup over your filter basket, lift the knocker, and give it a few taps.
I use the WDT tool to break up any clumps, spread the grounds, and then tamp them evenly.
The whole workflow is easy and enjoyable. The espresso I made had a rich crema, a chocolate aroma, and a syrupy body. The flavor was smooth, with caramel sweetness and almost no bitterness.

Exploring Different RPM Settings
I wanted to see how RPM affects espresso, so I tried two extremes: 1700 and 900 RPM. I kept the dosage at 18 grams and the grind settings I dialed in at 1300 RPM for both shots, using the same WDT tool and tamper.
At 1300 RPM, the shot time is 29 seconds, 18 grams in and 36 grams out.
At 1700 RPM, the shot extracted 38 grams in only about 20 seconds.
At 900 RPM, the extraction time was much longer—40 seconds for the same amount.
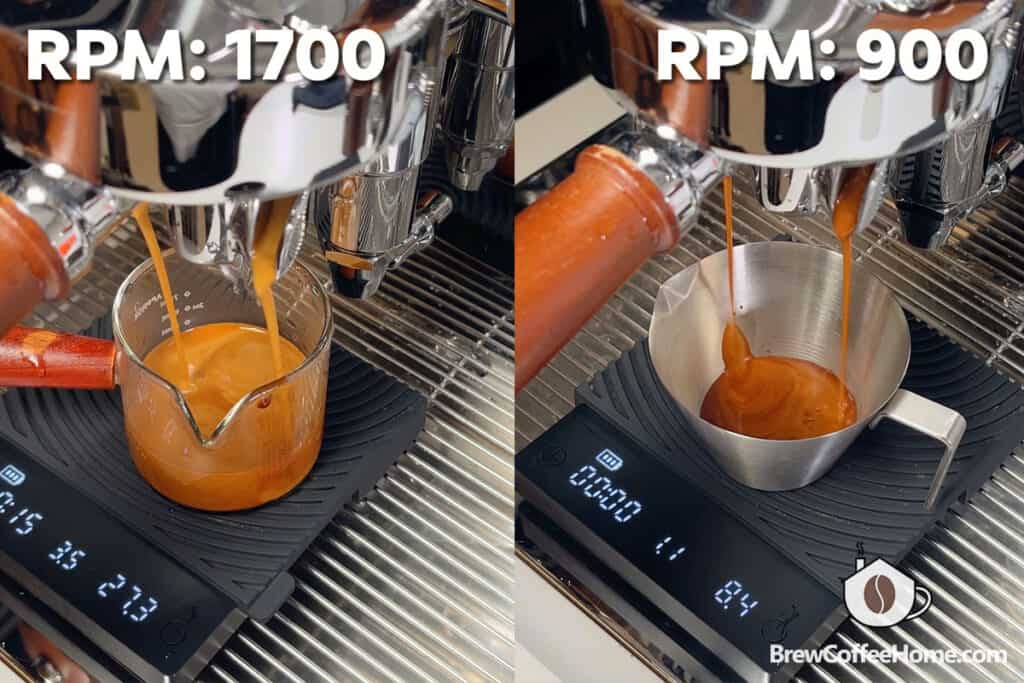
Lower RPM seems to make more fines, which adds resistance during extraction, while higher RPM makes fewer fines. This was the opposite of what I expected.
Adjusting the RPM definitely changes the flow rate and the espresso’s taste. Go finer when you increase the RPM and coarser when you lower it. It offers options for experimenting.
Performance with Filter Coffee
I also tried the Olentia for pour-over coffee. I used a grind size of 19 and set the RPM to 1700 for the first brew, with 15 grams of light-roasted beans. The process was similar to making espresso—once the grind was done, I shook the dosing cup to even out the grounds.

After brewing at 1700 RPM, I turned the RPM down to 900 and repeated the process. While the grind looked mostly the same, there were more fines at the lower RPM. I used the same pour-over recipe for both brews.
The taste difference wasn’t as big as it was with espresso. The higher RPM brew had slightly more acidity, but both cups were sweet, with hints of citrus and berry.
Overall, the Olentia works well for filter coffee, though it might be a bit better for espresso fans.
Cleaning and Maintenance
Cleaning the Olentia is easy. Turn the adjustment dial counterclockwise to remove it, then take out the bearing and lift the burr ring. The parts feel solid, but the burr ring is a bit heavy to remove.
The inside is simple—three scraper blades push the grounds toward the exit chute. To remove the burr, use a wrench to loosen the nut and be careful not to lose the small metal pin that holds it in place.

Once everything is apart, use a brush to clean the parts. When putting it back together, make sure all the parts line up correctly, and tighten everything securely.
If you don’t know how to disassemble or reassemble it, check out my review video. I’ve included the step-by-step guide there.
Calibration
Calibrating the grinder is also simple. Turn the grinder on and rotate the adjustment dial until you hear the burrs just touching. Then back off a little so they don’t clash. Turn the lower ring and line up the red letter “C” with the control button, and your grinder is calibrated.

Final Thoughts
The Olentia coffee grinder is a great choice for anyone who likes conical burr grinders, especially since most grinders on the market use flat burrs. The design is easy to use, the workflow is smooth, and the accessories are well-made.
The adjustable RPM feature is perfect for people who like to experiment with different flavors in their espresso or filter coffee.
Overall, I think the Olentia is a well-built, premium grinder that’s enjoyable to use and gives consistent results.